How to Remove / Decreasing Space Between Date & Post Title in Website
![How to Remove / Decreasing Space Between Date & Post Title in Website]() Reviewed by Adeel
on
March 28, 2023
Rating: 5
Reviewed by Adeel
on
March 28, 2023
Rating: 5
How To Create a Good Contact Page For Your Website
A “Contact” page is probably one of the most overlooked pages on a website. After all, it’s the homepage and product page that people will see first, right? And for sure it feels more fun, more exciting to work on the homepage or product page of your business. However, you’re missing out on a great opportunity to get in touch with your potential customers if you neglect your contact page. To create an amazing website, the quality of pages such as “Contact” should equally match your homepage. And this is especially true for small businesses. In this post, we’ll go through the various elements a contact page should have. Then you’ll learn how to create an awesome contact page in WordPress.
Why do you even need a contact page?
It’s very straightforward – the contact page is for people to reach out to you. Maybe they have questions about your product features, your delivery? Or they might need help with something? Or sometimes they even want to compliment you or say thank you to your business. Whatever the reason is, they need to find your information to contact you.
Visitors can interact with you and your brand through all the social media and communication channels you offer. You can talk directly to them through such channels too, but many of those tools operate outside of your WordPress website. At the same time, your social media personnel might not know all the answers visitors need. In some cases, visitors might prefer to contact you personally, and giving them a way to do that can lead to new relationships and opportunities.
This is especially important for freelancers, service providers, and small business owners whose business depends on direct contact with potential customers. Showing site visitors how to reach you can establish that there are real individuals behind the website, as well as turn your online space into a channel for two-way communication. And for small businesses, providing good user experiences is what encourages potential customers to do business with you.
What information should you include on your contact page?
Your contact page is unique to your business. Every company does it a bit differently. It can be tempting to just simply provide an email address along with a phone number and be done with it. However, this is exactly the lazy approach you shouldn’t follow.
In general, you can start with a welcome and explain why a visitor should contact you, as well as describe how you can help to solve your visitors’ problems. It doesn’t have to be long, just including a few short sentences will do the job.
Let’s say you make customized wallets for men. At the beginning of your page, you can say “Welcome! Got a question about our wallets? Reach out to us here”. Then you can direct them to use a contact form to communicate with you.
As far as what information you should place here, some information is essential, while some is nice-to-haves. Pick the information that is necessary for your business.
The essential information
1: A welcome message for this page and a call-to-action to invite visitors to contact you.
2: Your business phone number if you have that.
3: Your business email address. You can even include a few email addresses for different purposes, like an address dedicated to feedback and an address dedicated to business customers. One very important point to note is that it’s not obligatory for all businesses to include this information in the contact section. If your business operates at a very small scale, you might find it easier to manage communication via other channels such as social media.
5: Your address if you have a physical store or office. You can also just include your mailbox address instead if you don’t have a physical store.
6: Your business hours. What time do you work? How many days per week? Do you work on holidays as well? Make sure to quickly update your work hours in case there are changes.
7: Link to your social media channels, so visitors know where they can reach you on social.
Other interesting information you should really consider
1: Embed a map into your page, so people can easily see where your business is located.
2: A contact form where people can directly fill in their information (which we will talk more about later).
3: Direct visitors to read your blog by adding a call-to-action and including links to your posts.
4: An explanation on how you deal with contact requests.
5: Some websites even place their customer support information here as well, including live chat.
6: Your trade registration, or other certifications you have. This is to let people know your business is legit. For instance, this can be your Chamber of Commerce registration number.
7: You could even include a short company quote, or company motto when it comes to dealing with customer requests. For instance, you can have a banner at the beginning of the page which states your company motto, and then include a call-to-action to invite visitors to get in touch.
Depending on what your business is about, some of this information may absolutely be essential. For instance, a contact form is an essential element for quite a lot of businesses, but not all. Let’s say you provide house-moving services, then a contact form is probably a must-have. But if you’re a small café owner, then a contact form might be redundant in your case.
What makes a good contact page?
Can you remember how many contact pages you’ve come across that looked outdated while the rest of the website looked nicely polished? Don’t scare your potential customers away by having a mediocre contact page. There’s a very high chance they’re considering doing business with you if they look for your contact. They could still be making up their mind, so assist them in making their decision.
Use this opportunity to move them up your sales funnel, by exchanging communication and providing answers to their questions. You could even impress and motivate people to do business with you if you can utilize your contact page well.
A good contact page should perform its function, as well as leave a good impression on the visitors:
1: There should be call-to-actions that invite visitors to get in touch with you.
2: The contact information should be clear, easy to read, and easy to find. Next to that, visitors should be able to find your contact page with ease. Some good areas to place the “contact” section include the bottom footer, top navigation menu, or side navigation bar.
3: If you do include a contact form, redirect your visitors to a “thank you” page/screen to let them know that you’ve received their information. It’s annoying for your visitors to complete a contact form only to be redirected to a random page, leaving them confused.
4: Media such as images and illustrations are not required here. But have you seen a good contact page without any images? Use brilliant photography and illustrations to stimulate your visitors and add elements of aesthetic to your page. Choose images that express your brand personality and represent what your business is about.
5: Design, design, design! You definitely don’t need to make things complicated because a simple layout can work just fine (you will see that in some examples below). A brilliant page design will always create good impressions on your visitors. It allows your information and media to be nicely displayed, which makes it easier to read. Every piece of information, text, and image should properly scale with each other. Proper scaling is important for mobile users, especially if you do include a contact form.
6: Demonstrate that you’re trying to be helpful in your copywriting and texts. This is another good opportunity to build connections with your visitors, especially for small businesses. Let them know you’re willing to assist and help them.
Why use a contact form in your contact page?
One of the most important reasons to have a contact form is to reduce spam and keep your website secured. You might leave your “naked” email address on the contact page and think only the people who want to contact you would need this information. However, this is far from the truth.
Spammers can quickly pick up those email addresses and add them to their mailing lists. The result: your inbox is flooded with spam, scams, and potential malware. You could even lose your website if you’re not careful with spam emails. A contact form helps to reduce this problem, as your business email is hidden, while visitor’s requests will be generated as emails and sent straight to your inbox.
Not only that, but having a contact form brings other benefits such as:
1: It makes it easy for visitors to contact you directly.
2: These kinds of forms allow you to specify what kind of information you want to collect from visitors, and to let them know exactly what they need to do in order to reach you.
3: It allows you to delegate tasks to the correct person/team. For instance, your colleagues working at customer services will directly get an email when a visitor completes a form. Some businesses even let visitors specify what topic they want to reach out to the companies. This allows the right person/people to give answers, making the communication process faster and more efficient.
4: It makes your website look more professional.
5: It allows your data to be integrated with other useful tools such as email marketing providers.
6: It allows you to keep track of your inquiries. Contact forms are also extremely helpful if your business has a dedicated CRM system.
7: It allows you to automate your email response. If you set up your contact form properly, then it will automatically send response emails to visitors who completed your form, letting them know you’ve got their inquiries.
How to add a contact form in WordPress
Some WordPress themes do allow you to create a dedicated contact page along with a contact form. However, many of these are premium themes, meaning that you would have to pay to use them. You can manually a contact form in WordPress too, but this is definitely not a beginner-friendly approach. You would need some coding knowledge to do things this way.
Instead, you can use a plugin to help set up a contact form. There are plenty of plugins to choose from, each with its own pros and cons. Of course, the paid plugins will give you more freedom and more options to play with. But you can try the free ones to see how they work. In this post, we will be using WPForms, one of the most popular plugins for building contact forms.
To install WPForms, as with any plugin, go to your WordPress backend. In your left sidebar navigation, go to Plugins and Add new. Search for “WPForms” in the search bar and click install. After you’ve installed the plugin, the “Install” button will become “Activate”. You need to activate the plugin before being able to use it, so go ahead and click on the button.

WPForms will appear as an option in your left navigation menu. To create a new form, click on WPForms -> Add new.

There are several simple templates for you to choose from. Once you’ve selected a template, it’s time to customize the fields in your form. Click save when you’re done editing.

To add the form to your contact page, go to your contact page. If you don’t have one already, just create a new page to add your form to and set the slug to “contact” or “contact page”. Click on the + button in your top navigation, then search for WPForms block. Drag that to your page and select the form you’ve just created. There are actually more steps you have to take to set up a proper contact form, which you can find here. After you create your contact form, you should do some tests to see if your form works properly. Here’s how you can do it.

Do play around with the block options to create a nice layout for your contact page. Once you’ve created the page, it’s time to add it to your navigation menu. Go to your WordPress backend, on the left navigation menu, go to Appearances –> Menu. Select your contact page in the list of pages and add it to your desired menu. Congratulations, you’ve just created your contact page and indexed it on your website!

Some inspiration for your contact page
Below you will see some examples of a good contact page. They all include various elements that make up a good contact page. Use these as inspiration to create yours. And remember, choose the design and information that is suitable for your business and your industry.
1. Headspace
Headspace provides courses for people looking to start meditating. Once again, the company color scheme is presented clearly here, along with the company’s mascot. There is a clear list of emails for different contact purposes, which makes it easier for the various stakeholders working with Headspace.

2. Brandaffair
Brandaffair is a creative agency based in Romania. Everything about this contact page screams that the company is in the creative business. Not only is the overall design unique, but also how the company displays its contact form.

3. Moz
Moz provides SEO tools and SEO services for marketers as well as companies. The company contact page has the brand’s color scheme. Instead of placing the contact form here, Moz chooses to include a button that takes visitors to the form, making the page cleaner.

4. Cutea
Cutea is a bubble tea shop in the Netherlands. For a small shop owner, your contact page can just be as simple as Cutea’s. Since it is a small shop, the owners decided not to include an email address in this contact section. This is perfectly fine as well, as they may want to only use social media as communication channels.

Final thoughts on how to create a good contact page
Creating a good contact page isn’t a difficult task. It won’t take too much of your time. Don’t neglect your contact section because you’re too focused on other pages of your website. If you want an impressive website, then the quality of every page should match each other.
You just need to make sure to have a brilliant page design and include the essential information for your business here. And if you do include a contact form, make sure to test it well before you implement it. Put some care and attention into your contact page and who knows, you might just receive more calls and emails from potential customers!
How To Create a Good Contact Page For Your Website
![How To Create a Good Contact Page For Your Website]() Reviewed by Adeel
on
March 28, 2023
Rating: 5
Reviewed by Adeel
on
March 28, 2023
Rating: 5
How to Change The Sidebar Colors In Blogger / Blogs
Would you like to change the color of your sidebar to make it stand out? You can see on this blog what happened when I did this.
How to Change The Sidebar Colors In Blogger / Blogs
![How to Change The Sidebar Colors In Blogger / Blogs]() Reviewed by Adeel
on
March 28, 2023
Rating: 5
Reviewed by Adeel
on
March 28, 2023
Rating: 5
How to Change Label Names in Blogger / Blogs
I found this in Blogger Help. If you want to change the name of a label you have in your posts, read on...
Change the name of a label
Let's say you have a number of posts with the label
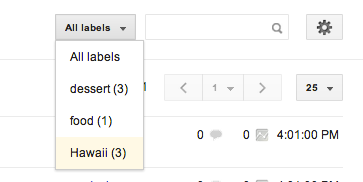
Hawaii but you've decided that you'd rather call it Vacation instead. You can't edit the name of a label directly, but there's a simple workaround to accomplish your goal:- Go to the Posts tab for your blog.
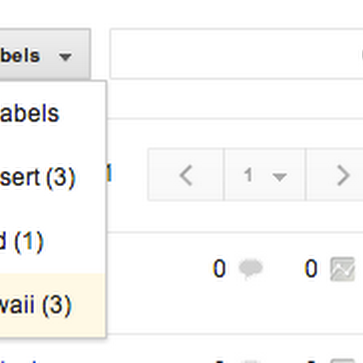
- Click on the "All labels" drop-down on top-right and select "Hawaii." This will filter the posts, so you'll only see those with the "Hawaii" label.
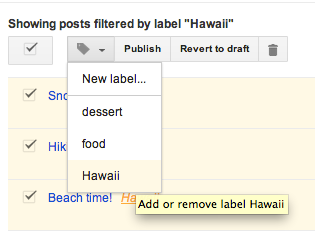
- Click the checkbox at the top of the list of posts to select all the posts.
- Then, click the Label icon and select "Hawaii" to remove the label "Hawaii" from all the posts that are selected.
- While the posts are still selected, click the Label icon again and select "Add new label." Then, type in "Vacation."


How to Change Label Names in Blogger / Blogs
 Reviewed by Adeel
on
March 28, 2023
Rating: 5
Reviewed by Adeel
on
March 28, 2023
Rating: 5
Reviewed by Adeel
on
March 28, 2023
Rating: 5
How to Change & Customizing Theme Templates in Blogger / Blogs
If you read my main blog, you will notice that it looks different. I changed templates. I am using the Picture Window template, the first one on that line of three.
How to Change & Customizing Theme Templates in Blogger / Blogs
![How to Change & Customizing Theme Templates in Blogger / Blogs]() Reviewed by Adeel
on
March 28, 2023
Rating: 5
Reviewed by Adeel
on
March 28, 2023
Rating: 5
How to Centering Post Title, Tabs (Pages), Date Header & Sidebar Gadget Titles in Blogger / Blogs
To center you post title, tabs, date header and gadget headers, go to Customize>Advanced>Add CSS, and type the following. Hit Space key after each addition...
How to Centering Post Title, Tabs (Pages), Date Header & Sidebar Gadget Titles in Blogger / Blogs
![How to Centering Post Title, Tabs (Pages), Date Header & Sidebar Gadget Titles in Blogger / Blogs]() Reviewed by Adeel
on
March 28, 2023
Rating: 5
Reviewed by Adeel
on
March 28, 2023
Rating: 5
How to Customize "Read More" Jump Link on Blogger / Blogs
How to customize the read more jump link on Blogger
Today’s tutorial is all about the “read more” jump link on Blogger. I’ll go through how to add it to your blog, change the text, add the post title, add an image and customize the look of it.
The default “read more” link doesn’t really stand out and let people know that there’s more to the post which is why most people like to change it. There’s so many ways to customize this so try out a couple and see what you prefer.
How to manually insert a ‘read more’ jump link in a post
When writing a post in Blogger, click the little broken page
to insert a “read more” jump link.
How to change the jump link text
You can alter the text manually in your HTML too. To do this go to Template > Edit HTML > Search for jump-link and find the following code
<b:if cond='data:post.hasJumpLink'>
<div class='jump-link'>
<a expr:href='data:post.url + "#more"'
expr:title='data:post.title'>
<data:post.jumpText/>
</a>
</div>
</b:if>
Change <data:post.jumpText/> to whatever you want to appear like Read More or Continue Reading for example. Save your template.
Show post title in the jump link text
To add the title of the post after the read more text go to Template > Edit HTML > Format Template. Search for jump-link and find the following code
<b:if cond='data:post.hasJumpLink'>
<div class='jump-link'>
<a expr:href='data:post.url + "#more"'
expr:title='data:post.title'>
<data:post.jumpText/>
</a>
</div>
</b:if>
Add <data:post.title /> after <data:post.jumpText/> so it looks like
<b:if cond='data:post.hasJumpLink'>
<div class='jump-link'>
<a expr:href='data:post.url + "#more"'
expr:title='data:post.title'>
<data:post.jumpText/> <data:post.title />
</a>
</div>
</b:if>
Save your template
Remove the auto-jump to after jump-break
After clicking “read more”, the page reloads and jumps to the line after the jump-break. If you want to remove this so it loads the post normally, go to Template > Edit HTML > Search for jump-link and find the following code
<b:if cond='data:post.hasJumpLink'>
<div class='jump-link'>
<a expr:href='data:post.url + "#more"'
expr:title='data:post.title'>
<data:post.jumpText/>
</a>
</div>
</b:if>
Remove + "#more" so you are left with the
following code…
<b:if cond='data:post.hasJumpLink'>
<div class='jump-link'>
<a expr:href='data:post.url'
expr:title='data:post.title'>
<data:post.jumpText/>
</a>
</div>
</b:if>
Save your template.
Add image, icon or button instead of read more link
There’s quite a few ways to do this, but here is a really simply way. Go to Template > Edit HTML > Search for jump-link and find the following code
<b:if cond='data:post.hasJumpLink'>
<div class='jump-link'>
<a expr:href='data:post.url + "#more"'
expr:title='data:post.title'>
<data:post.jumpText/>
</a>
</div>
</b:if>
Replace <data:post.jumpText/> with <img src='DIRECT IMG URL' /> so that it looks like this
<b:if cond='data:post.hasJumpLink'>
<div class='jump-link'>
<a expr:href='data:post.url + "#more"'
expr:title='data:post.title'>
<img src='DIRECT IMG URL' />
</a>
</div>
</b:if>
Now replace DIRECT IMG URL with the direct image source of the image you want to use and save your template.
How to style the “read more” link with CSS
To keep the link but make it suit your blog design go to
Template > Edit HTML and find ]]></b:skin>, if you’re having
trouble find the b:skin tag, check out this post.
Add the following above ]]></b:skin> and
add your styling in between the brackets.
.jump-link {
/* Style Entire Jump Link */
}
.jump-link a {
/* Style Jump Link Text Link */
}
.jump-link a:hover {
/* Style Jump Link Text Link On Hover Over */
}
For example, you could use something like the following
.jump-link {
text-align: right; /* align right of post - can also use
left or center */
background: #333333; /* change background colour for full
width of jump link */
}
.jump-link a {
background: #333333; /* change background colour for just
the text part */
color: #eeeeee; /* change text colour */
padding: 5px; /* change spacing around text */
border-radius: 5px; /* change radius of background */
font-size: 12px; /* change font size */
}
.jump-link a:hover {
background: #eeeeee; /* change background colour on hover */
color: #333333; /* change text colour on hover */
text-decoration: none; /* no text underline on hover */
}
which will make it look similar to the following
Make sure you aren’t missing any colons, semi-colons or
brackets in your CSS! Any errors will stop the browser from reading it
correctly.
How to Customize "Read More" Jump Link on Blogger / Blogs
![How to Customize "Read More" Jump Link on Blogger / Blogs]() Reviewed by Adeel
on
March 28, 2023
Rating: 5
Reviewed by Adeel
on
March 28, 2023
Rating: 5
How to Search / Find HTML Code Editor in Blogger / Blogs
How to search / find code in Bloggers HTML Editor.
Some times users are not able to find a certain code in the new HTML editor. The code is present
in all of Bloggers default templates, it may look a little different depending
on what template you are using and what changes you have made but it is there.
Blogger updated it’s editor to include some new features and unless you are
used to it, it can be confusing. This post will hopefully help to clear up some
queries and confusion.
- On the Dashboard, click Template/Theme > Edit HTML
- Click within the HTML box on the first line
- Press CTRL F on a PC or CMD F on an Apple. A search window will appear in the HTML editor in the right upper hand corner. Use this to find pieces of code.
Typically I give you a the whole line such as </b:skin> or <div
class="post-header-line-1"> instead of trying to search for
it all, take the main keyword such as b:skin and find the one
mentioned.
Once you have typed the code into the search bar, hit enter
to find the code. Hitting enter multiple times will find each time the code is
used.
A browsers own search function may not work in the HTML
editor, so it is necessary to click into the editor first. It searches
from top to bottom so make sure you click on the first line of code.
Use the numbering on the left to make sure you’ve gotten the right code. If you
are still struggling to find code in your editor, check out the posts below.
How do I find the CSS Section and ]]> </b:skin> in my template?
When you click Template/Theme > Edit HTML and first open
the editor you’ll see <b:skin> ... </b:skin>, this is your
style or CSS section. Click the arrow on the left to expand and scroll down
through your CSS until you come to the closing tag ]]> </b:skin>.
The line it’s on will depend on the type of template you have (Default Blogger or custom coded theme) and how much you’ve customised it yourself or altered code. The closing ]]> </b:skin> tag is right above <b:template-skin>.
Where is the HTML Section of My Blog.
The CSS section controls the style of your blog design, but
the HTML section controls the structure and content. Click Template/Theme >
Edit HTML and find <body>. As mentioned above, you may need to
search for only part of the word (like <body) as your body tag may have
other attributes. This is the start of your template markup which is where your
structure and content is. You may need to click the arrow on the left to expand
the code.
How to Search / Find HTML Code Editor in Blogger / Blogs
![How to Search / Find HTML Code Editor in Blogger / Blogs]() Reviewed by Adeel
on
March 28, 2023
Rating: 5
Reviewed by Adeel
on
March 28, 2023
Rating: 5
How To Create A Horizontal Navigation Bar in Blogger / Blogs
How To Create A Horizontal Navigation Bar in Blogger / Blogs
Someone just mentioned to me that they didn't know how to add a Blogger navigation bar. Well, it's quite simple. Most people seem to go for the horizontal version. Some for the vertical one on the sidebar.
How To Create A Horizontal Navigation Bar in Blogger / Blogs
![How To Create A Horizontal Navigation Bar in Blogger / Blogs]() Reviewed by Adeel
on
March 28, 2023
Rating: 5
Reviewed by Adeel
on
March 28, 2023
Rating: 5
How to Generate HTML Button with Code in Blogger / blogs Post
Online HTML Button Generator Code for Blogger Posts
Online HTML Button Generator with Link for Blogger Posts
helps you to add a button to your blogger post. Adding a button to your blogger
post increases views to your blog. HTML button link generator helps you to add
a button in the blogger post. This helps you to how to add a download button in
a blog post. You can increase the number of views to your blog by adding a
blogger post new post button.
By using HTML Button Generator for Blogger Post, You can
customize the button and you can change the button CSS.
In HTML button code generator for Blogger Post, You can
change the name of the button, You can change the referring URL of the button
and also you can change the style of the button.
Copy the code generated by HTML Button Generator and pastes
it in your blogger post HTML editor wherever you want.
HTML Button Generator Code
<a href=''
target='_blank'>
<input type='button'
style='padding-left:10px;padding-top:10px;padding-right:10px;padding-bottom:10px;margin-left:10px;margin-top:10px;margin-right:10px;margin-bottom:10px;background-color:#1b90bb;color:#FFFFFF;border-left-width:1px;border-top-width:1px;border-right-width:1px;border-bottom-width:1px;border-color:#d5d5d5;border-radius:5px;cursor:pointer'
value='Click Here!'
onMouseOver=this.style.backgroundColor='#FFFFFF';this.style.color='#1b90bb';this.style.borderColor='#d5d5d5'
onMouseOut=this.style.backgroundColor='#1b90bb';this.style.color='#FFFFFF';this.style.borderColor='#d5d5d5'
/>
</a>
Steps to add Button to your Blogger Post.
- Copy the above Generated Code.
- Go to your post editor.
- Click on HTML
- Paste the copied code wherever you want.
- Button will be added to your blogger post.
Note: To see your button, click on Preview or View Blogger Post.
How to Generate HTML Button with Code in Blogger / blogs Post
![How to Generate HTML Button with Code in Blogger / blogs Post]() Reviewed by Adeel
on
March 28, 2023
Rating: 5
Reviewed by Adeel
on
March 28, 2023
Rating: 5
How to Center Header Image in Blogger / Blogs
Centering Header Image in Blog
To center your header, go to Design>Layout>Customization>Scroll down to
Advanced>Add CSS.
How to Center Header Image in Blogger / Blogs
![How to Center Header Image in Blogger / Blogs]() Reviewed by Adeel
on
March 28, 2023
Rating: 5
Reviewed by Adeel
on
March 28, 2023
Rating: 5
How to Center Text or Images in Blogger / Blogs
Centering Text / Images With HTML Command
If you have the HTML code and would like it to be centered, this is what you do:
At the beginning of the code, before anything else, you add: <center>
Then at the end, after your code, you add </center>
How to Center Text or Images in Blogger / Blogs
![How to Center Text or Images in Blogger / Blogs]() Reviewed by Adeel
on
March 28, 2023
Rating: 5
Reviewed by Adeel
on
March 28, 2023
Rating: 5
How to Create A Box Frame Around Individual Posts on Blogger / Blogs
How to Create a Border Around a Post in Blogger
If you notice, I have a box around my individual blog posts. I like it this way because it separates it from the rest and to me looks more stream-lined.
How to Create A Box Frame Around Individual Posts on Blogger / Blogs
![How to Create A Box Frame Around Individual Posts on Blogger / Blogs]() Reviewed by Adeel
on
March 28, 2023
Rating: 5
Reviewed by Adeel
on
March 28, 2023
Rating: 5
How to Remove Lines Around Images in Blogger / Blogs
I wanted to get rid of the slight gray border around my images and my signature, which I made in Picmonkey.
Go to Design>Edit HTML (might want to back up your blog) and in a blank space type: CTRL F.
How to Remove Lines Around Images in Blogger / Blogs
![How to Remove Lines Around Images in Blogger / Blogs]() Reviewed by Adeel
on
March 27, 2023
Rating: 5
Reviewed by Adeel
on
March 27, 2023
Rating: 5
How to Find Your Genuine Voice As A Blogger
Finding Your Genuine Voice As A Blogger
Pick a theme. But realize readers will stick around for your voice, not your subject.
There are all kinds of blogs. We all know how important photos are to a blog. But there must be compelling words that grip and won't let go as well. For some types of blogs, I suppose.
How to Find Your Genuine Voice As A Blogger
![How to Find Your Genuine Voice As A Blogger]() Reviewed by Adeel
on
March 27, 2023
Rating: 5
Reviewed by Adeel
on
March 27, 2023
Rating: 5
How to Add Image Without A Sidebar Title In Blogger / Blogs
Adding Image Without A Sidebar Title In Blogger / Blogs
When you're adding an image to your sidebar, it says:
Required Field Must Not Be Left Blank.
How to Add Image Without A Sidebar Title In Blogger / Blogs
![How to Add Image Without A Sidebar Title In Blogger / Blogs]() Reviewed by Adeel
on
March 27, 2023
Rating: 5
Reviewed by Adeel
on
March 27, 2023
Rating: 5
How To Add "Read More" When Truncating Your Post In Blogger / Blogs
Add "Read More" When Truncating Your Post
You can do it this way automatically without having to manually add it: https://pakzonesite.blogspot.com/2020/04/automatically-truncating-posts-for.html
How To Add "Read More" When Truncating Your Post In Blogger / Blogs
![How To Add "Read More" When Truncating Your Post In Blogger / Blogs]() Reviewed by Adeel
on
March 27, 2023
Rating: 5
Reviewed by Adeel
on
March 27, 2023
Rating: 5
What is The Correct Way To Find Code Within HTML in Blogs / Blogger
What is The Correct Way To Find Code Within HTML in Blogs / Blogger
I finally figured out why Control F does not help me find anything inside the HTML of my blogs. I wasn't doing some things right, it seems, after a Blogger update.
What is The Correct Way To Find Code Within HTML in Blogs / Blogger
![What is The Correct Way To Find Code Within HTML in Blogs / Blogger]() Reviewed by Adeel
on
March 27, 2023
Rating: 5
Reviewed by Adeel
on
March 27, 2023
Rating: 5
How to Numbered Comments For Blogger / Blogs
How to Numbered Comments in Blogger / Blogs
Have you noticed my new look in the comment section? I got it from Spice Up Your Blog. And it worked so easily!
It looks like this...
It looks like this...
How to Numbered Comments For Blogger / Blogs
 Reviewed by Adeel
on
March 27, 2023
Rating: 5
Reviewed by Adeel
on
March 27, 2023
Rating: 5
Reviewed by Adeel
on
March 27, 2023
Rating: 5
Make Your Own Customized Hovering Pin It Button in Blogger / Blogs
How to Add Your Own Customized Hovering Pin It Button in Blogs
I wanted my own customized Pin It button to match my font and color. So I fetched code from another site. But it has their Pin It button code, not my customized one. I'll explain what to do about that. First, let's make a Pin It Button of our very own.
Make Your Own Customized Hovering Pin It Button in Blogger / Blogs
 Reviewed by Adeel
on
March 27, 2023
Rating: 5
Reviewed by Adeel
on
March 27, 2023
Rating: 5
Reviewed by Adeel
on
March 27, 2023
Rating: 5
Picmonkey Adds New Fonts
Picmonkey Adds New Fonts
I don't know about you, but Picmonkey is my favorite photo editing site. It is really all-inclusive. I can edit my photos, design a banner, or make a collage. So many things that I can't do on any of the other photo editing sites. I can do one or two, but far as I know, not all.
Picmonkey Adds New Fonts
![Picmonkey Adds New Fonts]() Reviewed by Adeel
on
March 27, 2023
Rating: 5
Reviewed by Adeel
on
March 27, 2023
Rating: 5
How can Disappear the Navigation Bar in a Blogger
Disappearing the Navigation Bar in a Blogger / Blogs
I just got this from Spice Up Your Blog and it worked for me.
You know that nav bar at the very top of your Blogger blog? Where you have New Post, Design, Sign Out?
How can Disappear the Navigation Bar in a Blogger
![How can Disappear the Navigation Bar in a Blogger]() Reviewed by Adeel
on
March 27, 2023
Rating: 5
Reviewed by Adeel
on
March 27, 2023
Rating: 5
How to Add A Recent Post Thumbnail Widget in Blogger / Blogs
Thumbnail Widget Adding into the Blog / Blogger
I would see this on blogs, but it would say Blogger Widgets. So I'd go searching. I could never find it. So I assumed they did away with it. Then, I don't quite recall how I did it, but I found a way, probably with FireBug (look it up on Firefox: It enables you to look inside someone else's code. Nifty, huh?
How to Add A Recent Post Thumbnail Widget in Blogger / Blogs
![How to Add A Recent Post Thumbnail Widget in Blogger / Blogs]() Reviewed by Adeel
on
March 27, 2023
Rating: 5
Reviewed by Adeel
on
March 27, 2023
Rating: 5
How to Add Dotted Line Under Post Title of Blogger / Blogs
Create Dotted Line in Blog Post
I was just playing around and decided I wanted a dotted line underneath my post title. I'm always changing things up. I like to, and besides, where would I get ideas to give you?
How to Add Dotted Line Under Post Title of Blogger / Blogs
![How to Add Dotted Line Under Post Title of Blogger / Blogs]() Reviewed by Adeel
on
March 27, 2023
Rating: 5
Reviewed by Adeel
on
March 27, 2023
Rating: 5
How to Add Border To Blogger/ Blogs Content
Border Adding in Blogs Posts
Here's another tip I just figured out. I wanted a black border around all of my blog content at Cozy Little House.
How to Add Border To Blogger/ Blogs Content
![How to Add Border To Blogger/ Blogs Content]() Reviewed by Adeel
on
March 27, 2023
Rating: 5
Reviewed by Adeel
on
March 27, 2023
Rating: 5
How to Add A Gadget To Header Or Sidebar at Blogger / Blogs
Adding Gadgets to the Sidebar of Blog
There’s one more thing you can do to personalize your blog,
and it consist of the sidebar—that part of your blog page that always appears
beside your posts. Blogger lets you add all manner of gadgets to the sidebar.
A gadget is a small, dedicated application that does one
thing and one thing only. For example, there are gadgets that display your
blog’s archive posts, gadgets that display a list of text items or web links,
gadgets that display a single picture or slideshow, and even gadgets that
display a live poll for your blog’s visitors to take. All gadgets are sized to
fit within your template’s sidebar; you can add as many as you like—or make
sense.
To add a gadget to your blog’s sidebar, start by opening the
Blogger Dashboard and selecting the Layout link for your blog. When the Layout
tab appears, select the Page Elements sub-tab.
Next, click the Add a Gadget link in the right column. (You
can also add gadgets below your blog, but they make more sense in the sidebar.)
You now see the Add a Gadget window.
There are several classes of gadgets available, as noted by
the tabs in the Add a Gadget window. You can choose from Basics
(Google-developed gadgets), Featured, Most Popular, and More Gadgets. The last
three categories offer gadgets developing by third parties.
Click the type of gadget you want displayed, then click the
+ button for the gadget you want to add. You now see a window for the specific
gadget you selected, which includes options for that gadget. Make the essential
choices, then click the Save button. The gadget is now added to your sidebar.
You’re not done yet, however. You now get to place the
gadget where you want it within the sidebar. Still on the Page Elements
sub-tab, click and drag the gadget to the desired position. Click the Save
button when you’re done.
By the way, one of the more versatile gadgets is the HTML
gadget. This item lets you add any type of item via HTML program. You can use
this method to add third-party gadgets and widgets you find elsewhere on the
web. Just make sure the gadget is sized to fit within your particular sidebar,
then copy and paste the HTML code as necessary.
Please let me know if you use it and if it works for you.
How to Add A Gadget To Header Or Sidebar at Blogger / Blogs
![How to Add A Gadget To Header Or Sidebar at Blogger / Blogs]() Reviewed by Adeel
on
March 27, 2023
Rating: 5
Reviewed by Adeel
on
March 27, 2023
Rating: 5
Subscribe to:
Comments
(
Atom
)